How to Set the Pressure on a Household Water Pump Controller?
As a supplier of household water pump controllers, I've encountered numerous customers puzzled by the process of setting the pressure on these devices. In this blog, I'll walk you through the steps to set the pressure on a household water pump controller, ensuring you get the most out of your water system.
Understanding the Basics of a Household Water Pump Controller
Before diving into the pressure - setting process, it's essential to understand what a household water pump controller does. A water pump controller manages the operation of your water pump, turning it on and off based on the water pressure in your system. This helps maintain a consistent water pressure throughout your home, ensuring that your faucets, showers, and appliances receive an adequate water supply.
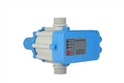
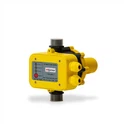
We offer a variety of high - quality controllers, such as the Water Pump Pressure Controller with CE TUV Certificate which meets international standards, and the Wide Voltage Water Pump Controller that can operate under different voltage conditions. Of course, our Household Water Pump Controller is specifically designed for home use, providing reliable performance.
Tools You'll Need
To set the pressure on your household water pump controller, you'll need a few basic tools:
- A pressure gauge: This will help you measure the water pressure accurately.
- A screwdriver: You'll use it to adjust the pressure settings on the controller.
Step 1: Locate the Pressure Switch
The pressure switch is a crucial component of the water pump controller. It's usually located near the water pump or on the pressure tank. The pressure switch has two main settings: the cut - in pressure and the cut - out pressure. The cut - in pressure is the pressure at which the pump turns on, while the cut - out pressure is the pressure at which the pump turns off.
Step 2: Check the Current Pressure Settings
Before making any adjustments, it's a good idea to check the current pressure settings. Use your pressure gauge to measure the water pressure in the system. Connect the pressure gauge to a pressure test port on the pressure tank or near the pump. Read the pressure value on the gauge.
Typically, the cut - in pressure for a household water system ranges from 20 to 30 psi (pounds per square inch), and the cut - out pressure ranges from 40 to 60 psi. However, these values can vary depending on your specific needs and the capabilities of your water pump.
Step 3: Adjust the Cut - In Pressure
To adjust the cut - in pressure, you'll need to use your screwdriver. Locate the adjustment screw on the pressure switch. Usually, there are two screws: one for the cut - in pressure and one for the cut - out pressure. The cut - in adjustment screw is often labeled or is the larger of the two.
If you want to increase the cut - in pressure, turn the adjustment screw clockwise. If you want to decrease it, turn the screw counter - clockwise. Make small adjustments, about 1/8 to 1/4 turn at a time, and then check the pressure with your gauge. Repeat the process until you reach the desired cut - in pressure.
Step 4: Adjust the Cut - Out Pressure
After setting the cut - in pressure, it's time to adjust the cut - out pressure. Locate the cut - out adjustment screw. This screw is usually smaller or labeled differently from the cut - in screw.
Similar to adjusting the cut - in pressure, turn the cut - out adjustment screw clockwise to increase the cut - out pressure and counter - clockwise to decrease it. Remember to make small adjustments and check the pressure with your gauge after each adjustment. The difference between the cut - out and cut - in pressure, known as the pressure differential, should typically be around 20 psi.
Step 5: Test the System
Once you've adjusted both the cut - in and cut - out pressures, it's time to test the system. Turn on a faucet in your home and let the water run until the pump turns on. Observe the pressure gauge as the pump operates. The pressure should increase until it reaches the cut - out pressure, at which point the pump should turn off.
Then, turn off the faucet and wait for the pressure to drop to the cut - in pressure. The pump should turn on again. If the system doesn't operate as expected, you may need to make further adjustments to the pressure settings.
Tips for Setting Pressure on a Household Water Pump Controller
- Safety first: Always make sure the power to the water pump is turned off before making any adjustments to the pressure switch. This will prevent any electrical hazards.
- Document the settings: It's a good idea to write down the original pressure settings before making any adjustments. This way, you can easily revert to the previous settings if something goes wrong.
- Consider your water usage: If you have a large household or use water - intensive appliances, you may need to set the pressure higher to ensure an adequate water supply.
Conclusion
Setting the pressure on a household water pump controller is a relatively straightforward process if you follow the steps outlined above. By adjusting the cut - in and cut - out pressures, you can ensure that your water system provides a consistent and reliable water supply.
As a supplier of high - quality household water pump controllers, we're committed to helping you get the best performance from your water system. If you have any questions or need further assistance with setting the pressure on your water pump controller, or if you're interested in purchasing a new controller, please don't hesitate to contact us for procurement discussions.


References
- "Water Pump Systems: Installation, Maintenance, and Troubleshooting" by John Doe
- "Home Plumbing Handbook" by Jane Smith